


|
|
|
|
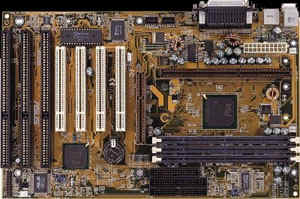
ASUS P2B BX
Motherboard
The ASUS P2B motherboard is a highly rated BX board that supports the 100mhz FSB. ASUS has gained tremendous popularity due to its high quality build, great overclocking stability, and compatibility with a wide variety of peripherals. Opening the nice purple box which my P2B came in, I saw the coloured manual lying beside the installation CDROM disk which included the BIOS flashing utility, ASUS Probe (M/B monitoring tool), Intel LanDesk Client Manager software, DMI utility and PC-Cillin Lite. A sealed packet contained the IDE ribbon and Floppy ribbon cables. Nearby, was a box which upon further inspection, revealed the mounting bridges, retention mechanisms and a bag of spare jumpers. Underlying a layer of sponge and cardboard was the motherboard kept in an anti-static bag. Well, I eagerly pulled out the board for inspection and I wasn't disappointed. It was quite a delight to see a solidly built board (well at least the components didn't look cheap!) Features
Items in the Package
Installation Before the installation, I had briefly gone through the well organised manual. It included many pictures which were a great aid to facilitate easy understanding for dummies like myself. The page which drew my immediate attention was the settings of the jumpers for the bus speed and clock multipliers. I didn't have the courage to try the 133mhz bus speed yet, so ambitious I may be, I first tried 3.5 X 112mhz = 392mhz. After adjusting the jumpers, I popped in my 128Mb of LGS PC100 -7J SDRAM into DIMM slot 1 and 2. Feeling ecstatic after having done that quite easily, I went on to mount the PII-333 CPU (SL2QF Malaysia) onto the board. I'd bought the boxed version which came with a nice active heatsink already seated on the CPU. I installed the stands that came with the CPU instead of the ones from the mobo package. Initially, I didn't slide the CPU straight enough and it kind of jammed and got stucked in an unlevelled position. Oops Number One! It had half the row of pins in the Slot 1 but the other half remained unseated. I had to use considerable force to remove the CPU from the mobo and reinsert it more carefully again. The second attempt was successful. Fixing the motherboard into the case was quite a common sense thing which took just a little while to accomplish in my ElanVital T-10AB casing. Luckily for me, there was an abundance of space to maneuveure. So the next mission was to put the relevant IDE cables, power supply cables, and LED cables onto the mobo. This was fairly easy too as the T-10AB had the LED cables clearly labelled. Soon, I was inserting my PCI and ISA cards into the various slots available. This was easy man! I had done this before and had already thought out how I was going to arrange the cards. Overclocking Since I was planning to overclock my PII-333 on this baby, I had taken the necessary cooling preparation. In addition to the PSU fan which was set to exhaust air by default and the CPU fan, I've got the following installed:
Ok, since all my drives were long fitted in their bays, everything seemed well and done. It was power up time! I fired it up and felt a sense of relief when it POSTed showing 392mhz. That was fine and I pressed the DEL key and went on to tweak my BIOS. It was fairly easy up till this point. I was once again very eager to test out the latest beta ACPI BIOS that I had downloaded from the ASUS German FTP site. The AFLASH utility that came with the CD was straight-forward and well, quite idiot proof for that matter. It allowed me to save my previous v1002 BIOS into a file before I flashed in v1005.16 (latest at that point of time) without a hitch! So I went on to install Windows 98. The installation started fine initially until several reboots later when Win98 was trying to set up itself to run for the very first time, some video garbage appeared on screen and everything froze. Oops Number Two! I didn't care, I rebooted and surprisingly, it managed to complete the loading up of Windows 98. It was time to play around. Sigh. After a short while of usage, the PC would hang mysteriously and garbage would appear onscreen. Shucks! Well, I suspect that my PCI Diamond Viper V330 wasn't very happy with the 37.33mhz bus speed. It was my first setback. :( Of course, can't blame the mobo for this. So I hesitantly slid opend the side panel of my casing and re-adjusted the jumpers this time to 4 X 10³mhz (a relatively safe setting since the bus speed only slightly increased from 33.33 to 34.33mhz). At this speed, everything was rock stable. Compatibility Most of the devices were successfully detected without conflicts whatsoever, with the exception of my Terasound A3D PCI soundcard which turned up a slight problem that also occurred on my retired Pentium 166 PC. System Properties showed an exclamation telling me that the legacy SoundBlaster Emulation on the A3D card could not be enabled because it could not find any free IRQs. (though I didn't play DOS games anymore, the !!!! on the page was simply annoying) Most of you probably won't see this, but because I had so many damn cards installed. Evey slot was occupied. Every IRQ seemed to be taken up too. I have 4 PCI and 2 ISA slots but they are all used up. However the workaround was simple (I was just hoping the P2B would be smart enough to do it automatically). I'd shutdown Windows and went back to the BIOS setup. Under the PnP section, I merely had to tell the BIOS that IRQ 5 must not be automatically allocated to any cards but reserved for a legacy device (which usually means the SB cards, as that always default to use this interrupt). With everything else settled (no more boring details of installing every application), I thought I'll push this baby even further! Even More Overclocking! Here's my success and failure story:
System Specification
Benchmarks Since I only got to run my PC reliably at 412mhz, here's the detailed benchmark results on a P2B mobo: WinBench 98
Wintune 98
Cooling and Temperatures Well, I had mentioned about cooling earlier on, so I'll touch a little on the temperatures of my P2B running at 412mhz. To test this, I first noted a freshly started up PC was at room temperature (my air-conditioned room) of 27-28 deg Celsius. Then I ran Final Reality 1.01 and set it to loop endlessly. I allowed the PC to work for 2 hours before checking the temperatures again. I found out that at this speed, the CPU remained only VERY slightly warm and my mobo stayed at about 27-28 deg Celsius. Still dissatisfied, I installed Unreal and played it for a couple of hours. This time, I saw the temperature rose to 29 deg after playing. Ok! Ok! I hear you yelling "Unfair!" and so I turned off my air-conditioner and allowed my PC to run at the normal room temperature of tropical Singapore (which is around 28-29 deg C). This time, performing the Unreal test I mentioned above, saw temperatures rise to 33 deg celsius. Hmm... I think this is still marvellously low! (Lesson: Never forget the 3 most important words for an overclocker, "COOLING, COOLING and MORE COOLING!!!!") Conclusion The Good Here it is, my overall impression of the board. It is a well built board and the entire package is of very high quality. From tiny things like the screws, mounting bridges, cables, manual and software CD all showed how much they prided themselves on delivering a world-class product. (I really liked the small bag of nice blue spare jumpers!) Everything was well thought out. These aside, it is a stable and highly overclockable board supporting incredible multipliers from 2.0-8.0 and CPU BUS clock of 66.8 - 133mhz!!! There is also an undocumented jumper setting of 2-3, 2-3, 2-3 to achieve a 133mhz/4 BUS clock which allows for the use of the 133mhz FSB but a safe bus speed of 33.33mhz. The Bad This board only has 4 PCI and 3 ISA (1 shared) slots as opposed to newer boards like ABIT's BH6 board with 5 PCI and 2 ISA slots. The ASUS P2B also lack a jumperless design like ABIT's which comes with the convenience of their critically acclaimed SoftMenu II. Lastly, my biggest complain is that the ASUS supports auto voltage adjustment which actually worked against it especially for expert overclockers who would definitely demand more flexibility. Recommendation Sure, go buy it. You can't really go wrong with an ASUS board. The support in terms of new BIOS is incredible, you can easily find the latest beta and final BIOS from ftp.asuscom.de/pub/ASUSCOM/BIOS/Pentium_II/i440BX and there is also a very popular newsgroup specifically for ASUS motherboards. Over at alt.comp.periphs.mainboard.asus you'll be able to find most of your questions about your Asus board. In my opinion, it's only other serious contender is the ABIT's BX6 or its latest sibling the BH6. Yap. That's all folks!
13 September 1998 11:34 AM |
 Introduction
& First Impression
Introduction
& First Impression